Optimized wallet-sized coin holder
An optimized, wallet-sized 3D-printed coin holder designed to carry exact change in a credit card form factor.
Click image above to view gallery
3D printed coin holder
Now, I typically never pay with cash when I have the option of using a credit card, and I can honestly say I’ve never paid with exact change other than quarters. However, this problem seemed particularly interesting to me as a project because:
- There was a clear objective (make something that holds coins more better-er)
- There were obvious optimization constraints (make it as small/thin as possible)
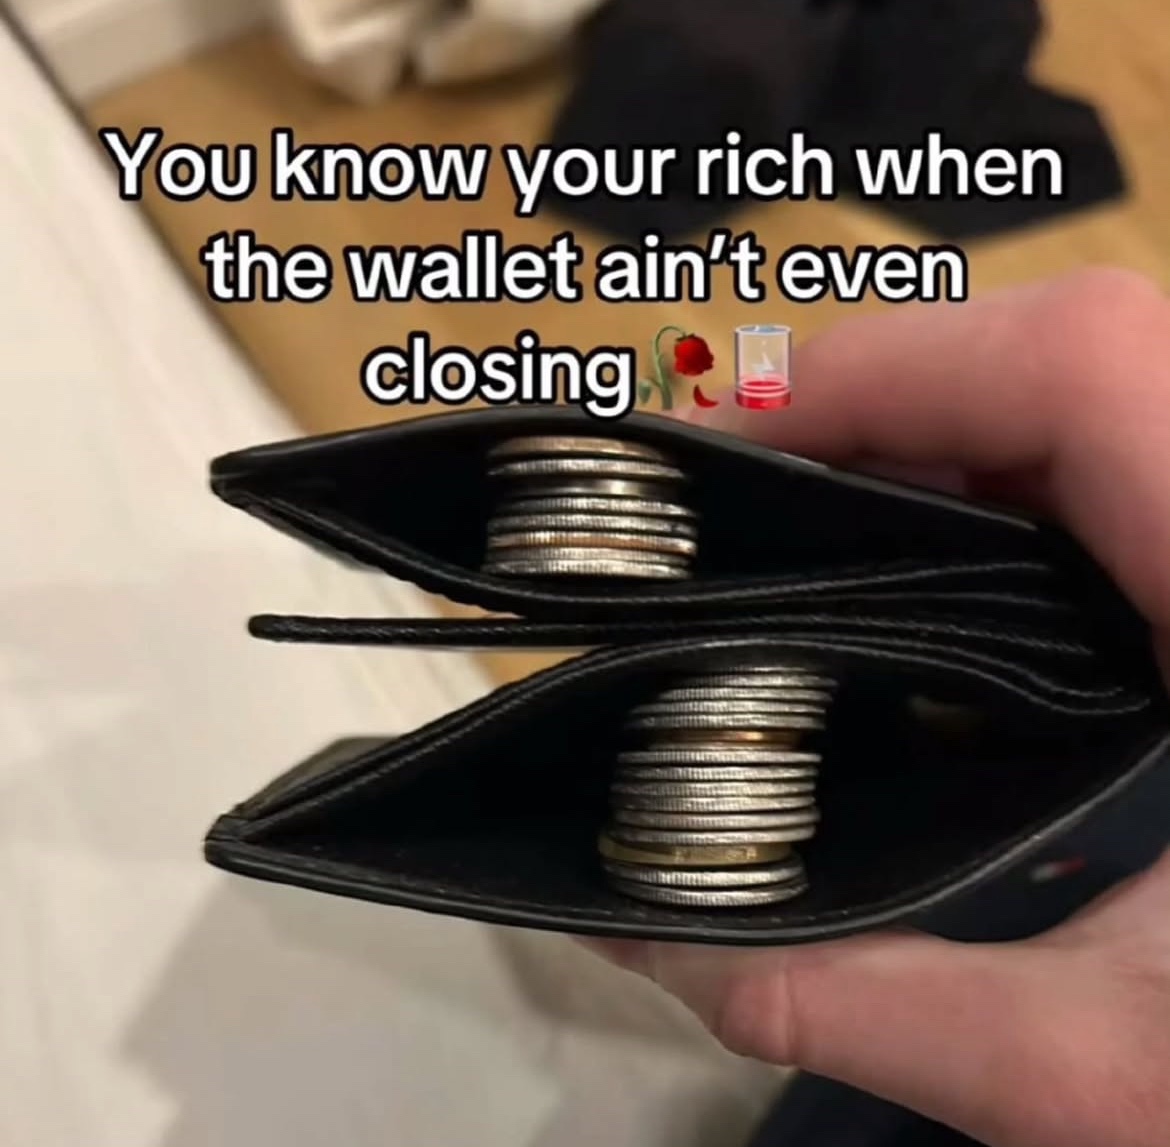
- It represented a solution to an almost universal problem ( … from 20 years ago)
- I hadn’t seen anyone attempt something similar before
- I thought it would be a good use of 3D-printing
Considering these factors, the idea fell into the unique category of having a clear objective, interesting design parameters, and initially didn’t seem like it would be that complicated (a classic).
The Design Process
Precedence
I didn’t start out researching if this existed and instead assumed that because I hadn’t seen it before it meant it simply never existed. It was only later on in the design process that I spent some time looking for similar examples. I was positive that humans had simply spent too much time carrying around change to not have already tried thinking of a better solution. I was mostly correct and found a few different examples after some googling and checking a few different LLMs with deepsearch. The closest overall was definitely ChangeCard.com but I found some examples from etsy for coin holders as well.
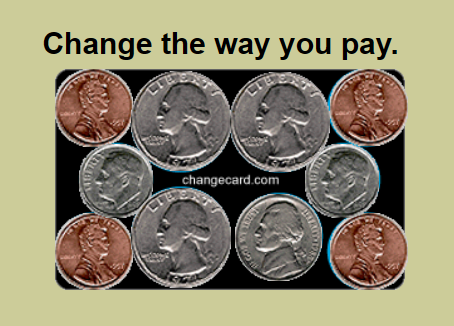 ChangeCard coin layout
ChangeCard had clearly already come up with a similar concept, although not for the same purpose. It was designed as a “unique educational tool that teaches kids how to make change, how to manage money, and how to understand America’s monetary system”, and “primarily as a promotional product”. So its intention was not to allow someone to conveniently store coins and make exact change for a purchase, but instead as a tool or game to teach someone to make exact change.
I couldn’t find any examples of the physical changecard product (the website has clearly not been updated since the early 2000s), but I did find a few product listings on etsy of coin holders. However, the etsy designs either did not have the proper number of coins to make perfect change, weren’t designed for US coins, or were too large to fit in the credit card slot of a wallet. So I continued working on this with only the slight disappointment of not having come up with a novel idea.
Constraints
Optimal Coin Set
There were a few design aspects I decided on immediately. The first was that I needed to use as few coins as possible to make any value from 1-99. Calculating the minimum number of coins needed is a fun math problem I had done in school, feel free to give it a try if you don’t already know the answer.
Click to reveal the solution
The optimal solution is 10 coins (8 if you used a half-dollar), but there are actually 2 different sets of 10 that will work.
- Set 1: 3 Quarters, 1 Dime, 2 Nickels, 4 Pennies
- Set 2: 3 Quarters, 2 Dimes, 1 Nickel, 4 Pennies
Both sets use 10 total coins, but Set 2 actually totals to $1.04 instead of Set 1’s 99¢. More importantly for us, a dime is smaller than a nickel, so we should be able to find a more compact arrangement using Set 2 as well (and can make change for a whole dollar!)
Dimensions
The other main constraints were the dimensions of the coin holder. The original intention was to make this as thin as possible, and the nickel is the thickest coin we need to use (1.95 mm) so we can’t do any better than that. For length and width, the natural starting place was to match the dimensions of a credit card to make it compatible with almost every wallet. The standard dimensions for credit cards are 85.6 × 54.0 mm with an approximate area of 4,620 mm².
A smarter person would have pulled out a credit card and tested to see if they could fit the 10 coins on top, but let’s do some napkin math to see if it’s possible. Looking at the coin specifications from the US mint, we can calculate the total area of our coins.
| Coin | Diameter (mm) | Area (mm²) | Quantity | Total Area (mm²) |
|---|---|---|---|---|
| Quarter | 24.26 | 462.2 | 3 | 1,386.6 |
| Dime | 17.91 | 252.0 | 2 | 504.0 |
| Nickel | 21.21 | 353.3 | 1 | 353.3 |
| Penny | 19.05 | 285.0 | 4 | 1,140.0 |
| Total | 10 | 3,383.9 |
Total Area = π × (radius)² for each coin = 3,383.9 mm²
This total area is actually less than the area of a credit card (4,600 mm²), so it should theoretically be possible to fit all the coins within the footprint of a credit card. However, this calculation assumes perfect packing efficiency, which isn’t possible with circular shapes. For identical circles, the optimal packing efficiency is π/4 or about 78.5%. If we take our total coin area of 3,384 mm² divided by the maximum area of 4,620 mm², we need to achieve at least 73.2% packing efficiency, which suggests that it may be possible.
Packing Simulation
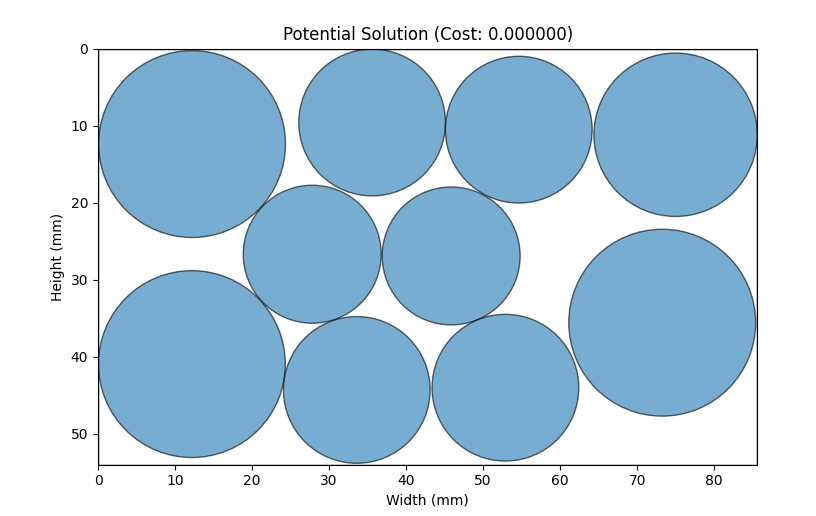
Packing circles of unequal sizes is an NP-hard problem, so it’s almost impossible to say which physical arrangement of coins is going to be optimal. There is actually quite a lot of research on this specific problem, but for simplicity (and based on the advice of Gemini 2.5) we can use simulation to find out if it’s possible to arrange the coins in the area of a credit card and determine some of the compact arrangements.
Simulated Annealing
To solve this packing problem, I used a simulated annealing algorithm - a probabilistic technique inspired by the annealing process in metallurgy where metals are heated and slowly cooled to reduce defects. The algorithm works by:
- Starting with a random arrangement of coins within the credit card boundaries
- Repeatedly making small random adjustments to coin positions
- Accepting changes that improve the arrangement (reduce overlaps and boundary violations)
- Sometimes accepting worse arrangements early in the process to avoid getting stuck in local optima
- Gradually “cooling” the system to settle into a final arrangement
The cost function evaluates how “good” an arrangement is by calculating:
- How much coins overlap with each other (which we want to minimize to zero)
- How much coins extend beyond the credit card boundaries
- The total compactness of the arrangement
Github Link: simulated_annealing.py
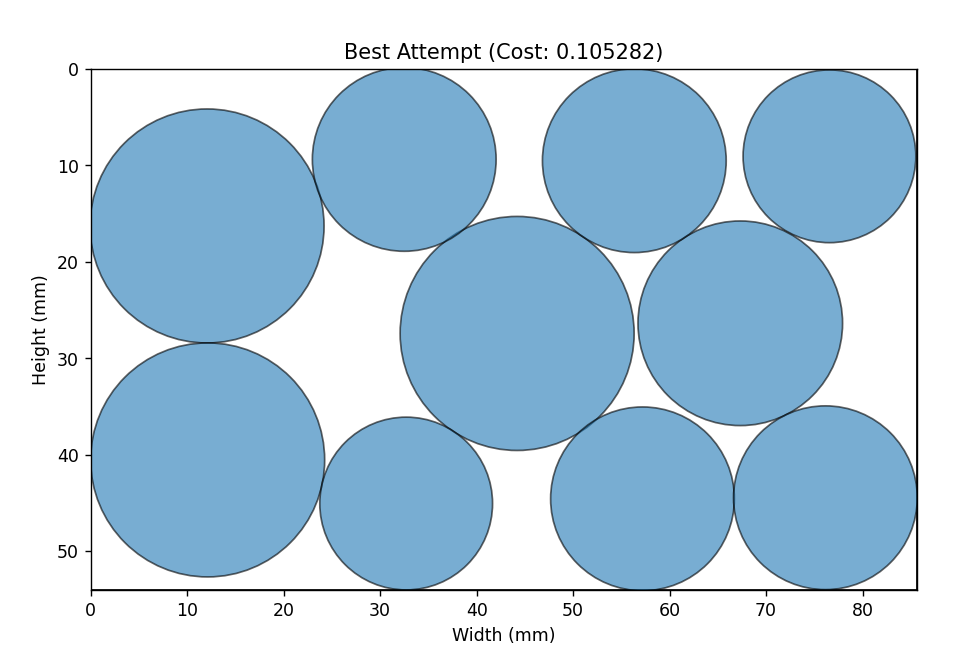
I ran this script several times and was eventually able to find at least one arrangement that produced a valid solution:
Caveats
Even though I found out it was possible to optimally arrange the set of coins within the boundary of a card, there were a few reasons I had to relax the constraints. I wanted to avoid non-symmetrical layouts for aesthetics and ideally I would place larger value coins closer together. This way it would be more natural to access coins starting quarter –> dime –> nickel –> penny to follow the mental math process of computing the total change amount. Additionally, I knew that I would need some amount of tolerance for coins that may be shaped slightly differently than others.
Initial Design
Transition Fit
Now that I had the layout decided, I started mocking up sketches in Fusion. Configuring the layout of the coins was simple, but the next thing I had to determine was how someone was going to insert and remove coins without them falling out. The usual suspect here was using a small offset in the design (0.1-0.3mm) so that if you inserted a coin from the top you could press it into the slot for each coin. If I added a small cutout below each coin you would also be able to push it out from the bottom. An extra layer would be to draft the angles inward by a few degrees so that coins which might be worn down on the edges would still be retained.
3D Printing Optimizations
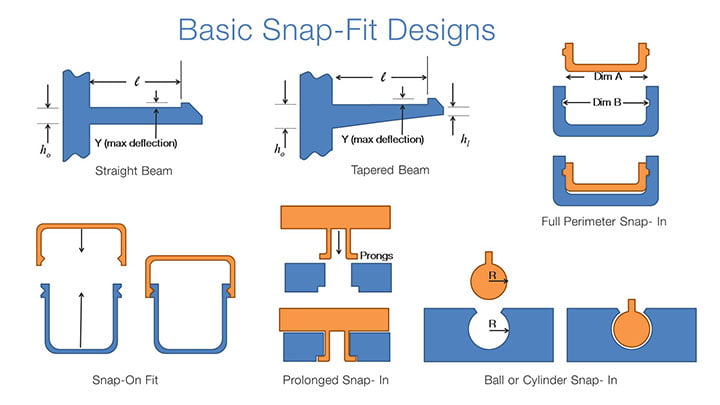
Snapfit
A more reliable design to account for variation in coin sizes would be to use a snapfit or over-center mechanism. By using the natural flexibility of 3D printed parts, we can design a gap that is smaller than the diameter of a coin, and by pushing the coin we can expand that gap to insert a coin. As long as the part isn’t stressed too much, the piece will flex back into place and create a gap that is now holding the coin in place. By experimenting with different cross sections, thickness, plastics, etc. you can control the amount of stiffness and make it easier or harder to insert or remove a coin. Snap-fits can be tricky to design without using supports but are under-utilized for 3D printing parts that can be printed and assembly without fasteners.
Edge Coins
For the coins on the outside edge of the holder, I used a gap width 0.2 mm smaller than the original coin diameter and created the holding cavity with a diameter 0.2 mm larger. That probably seems like a small amount, but it is the difference between the coin requiring force to insert and spinning freely in the holding cavity. The extra benefit of this design is that we are only stressing the plastic when moving the coin, so we avoid ‘creep’ that may cause the flexure to become overworked and weakened over time.
To hold the coin from above, I added a chamfered transition to a circle 1.2 mm smaller so that the coin would not fall out if the holder was turned upside down. On the bottom edge, I added a slot cutout which makes it easier to pinch the coin from the top and bottom when inserting/removing.
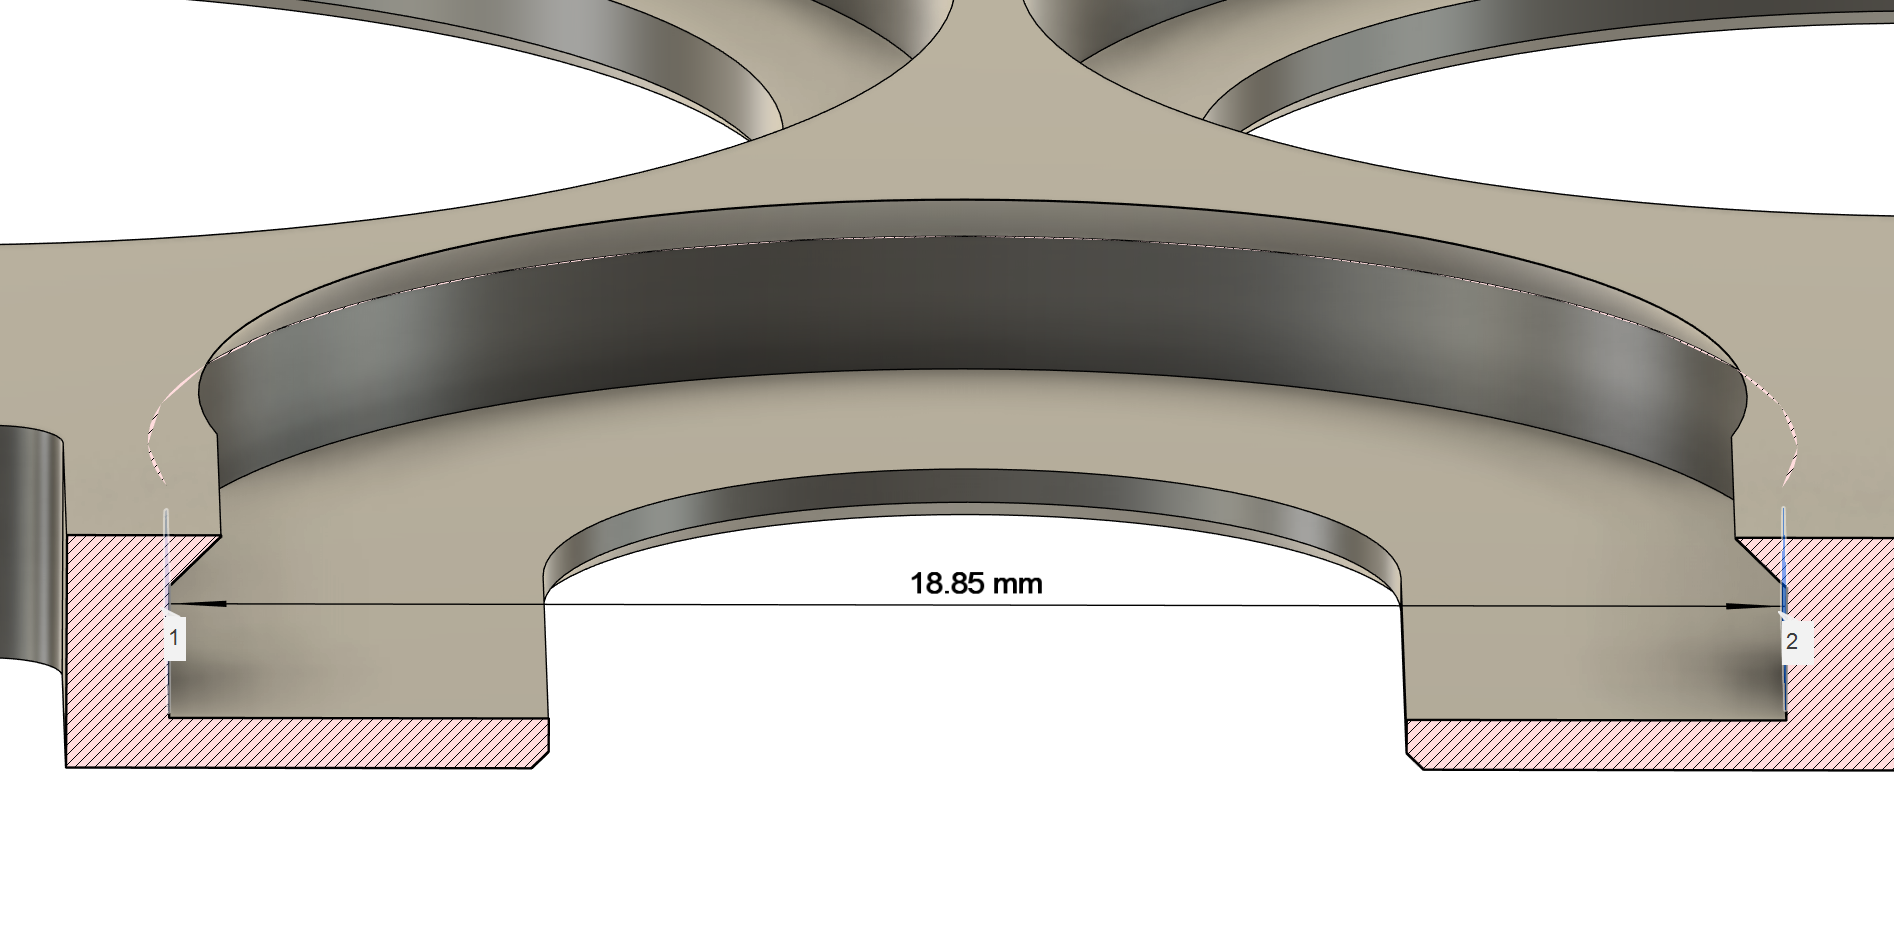
Interior Coins
There are two coins on the interior of the holder, a quarter and a nickel. It’s not possible to use the same snapfit techniques for these coins since there isn’t enough space to insert them from the side. We still have our same problems from the transition fit from before, so I tried to come up with something more clever. We need something that can snugly fit coins which are slightly over and under sized. My approach was to design an ‘arm’ that by default is narrower than the coin but can flex outwards to fit the coin. This way the coin can be inserted from the top, and the arm will apply pressure from the side to keep the coin in place.

Layer Heights and Widths
Another significant design consideration was to keep in mind how the 3D model would be sliced for printing. 0.2 mm is a standard layer height for most printers, so every vertical thickness of the coin holder is a multiple of 0.2 mm. This worked out well for the spacing of the coins since the thickness of coins are also near multiples of 0.2 mm (1.75 mm for a quarter, 1.35 mm for a dime, 1.95 mm for a nickel, 1.52 mm for a penny). To keep the holder somewhat rigid, I use 0.6 mm (3 layers) for the top and bottom layers and default 1.6 mm for the coin holders. That puts the total height of the holder at 2.8 mm or about 3.5 credit cards thick. Some material could likely be saved by thinning out the top and bottom but would sacrifice rigidity.
Layer width was another critical consideration. The width of the line being laid by the print head can technically vary, but I find it best to design in intervals of 0.4 mm. This is especially important when defining the thickness of walls between coins. If the wall is too thin, the slicer may ‘delete’ portions of the wall below the layer width and cause gaps. Similarly, I round sharp corners to intervals of 0.4 mm which generally results in a smoother path for the print head.
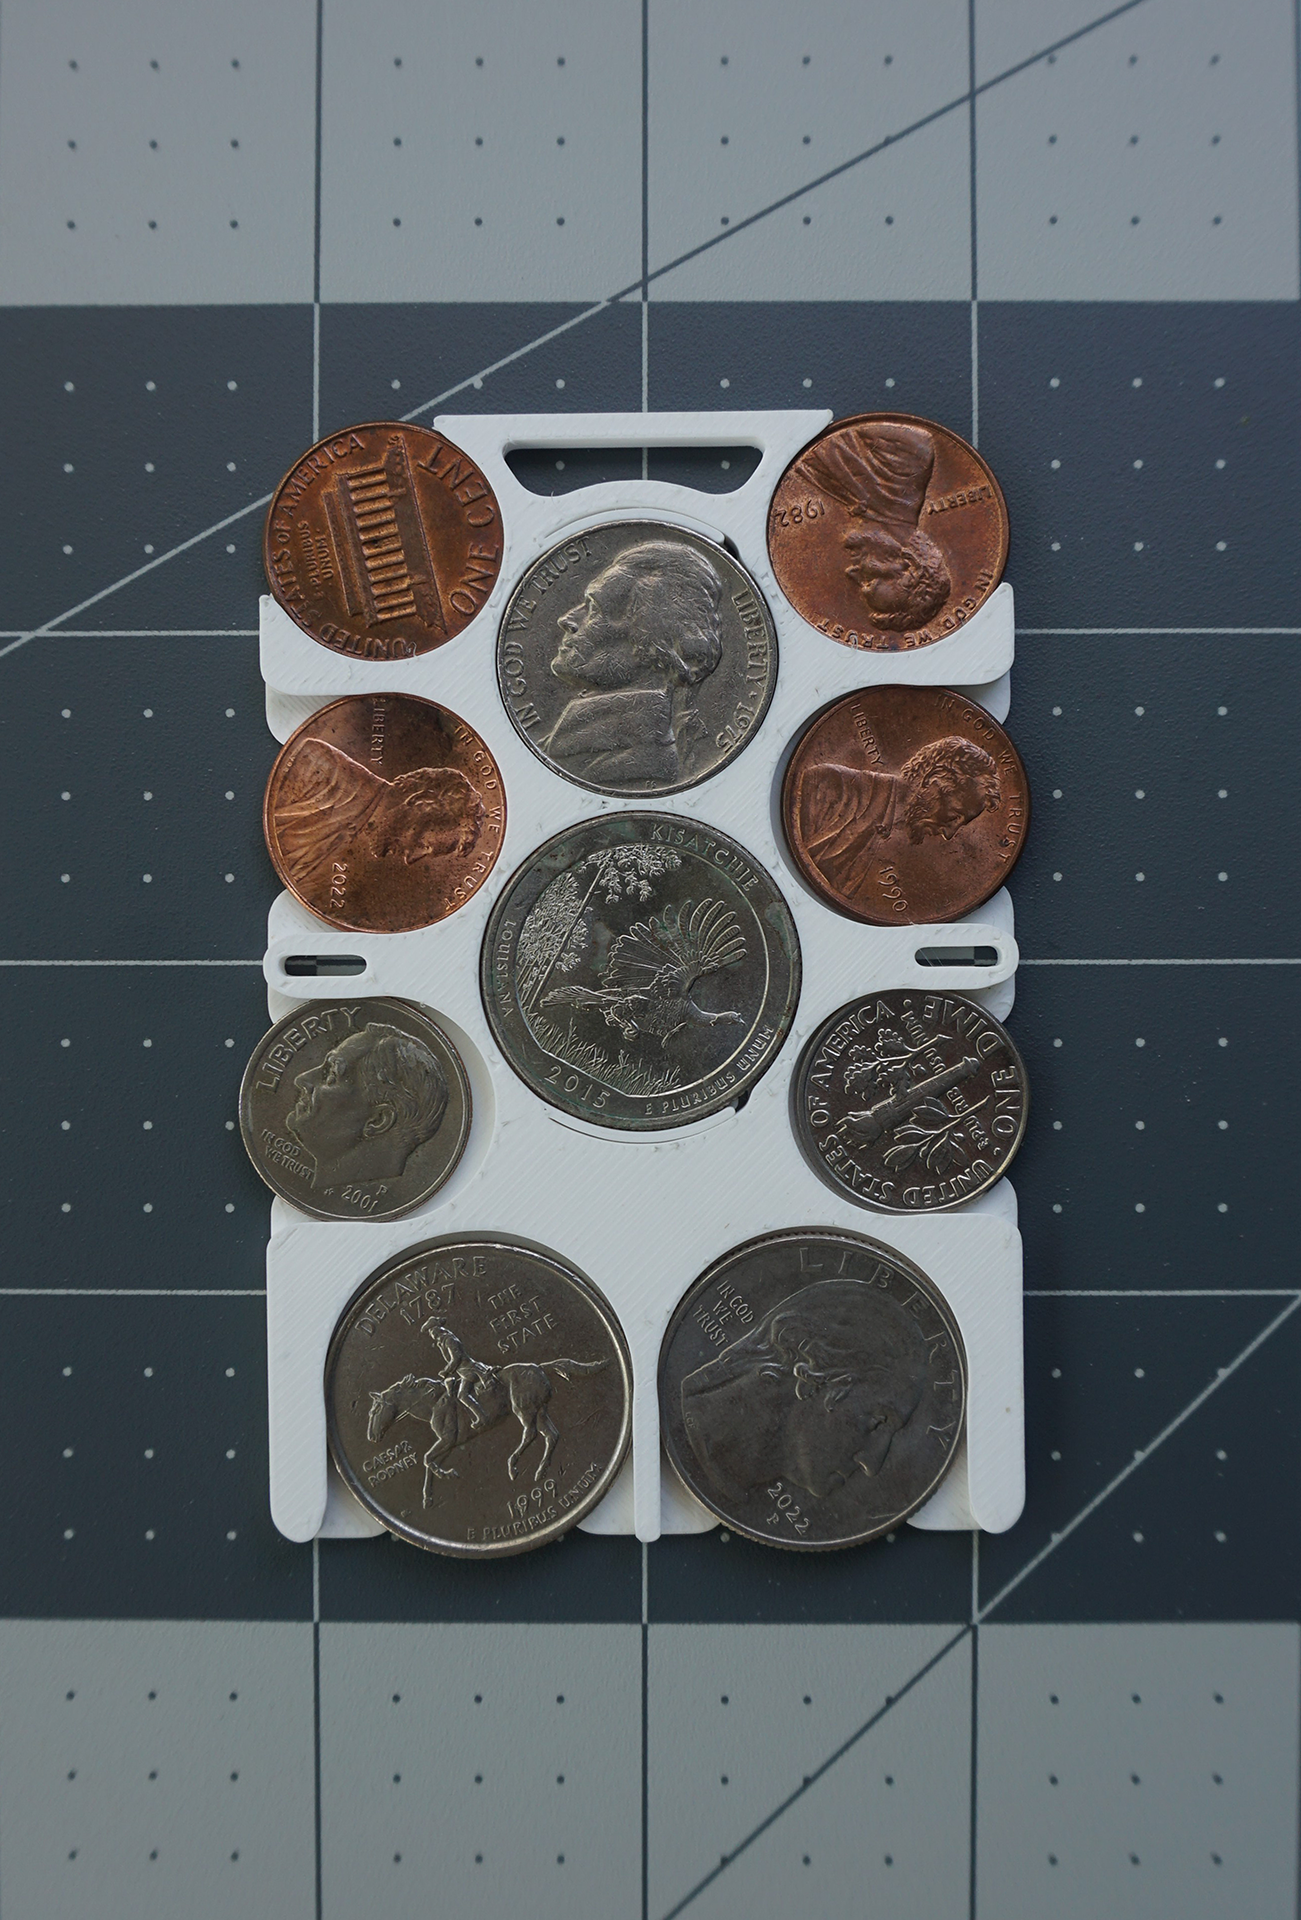
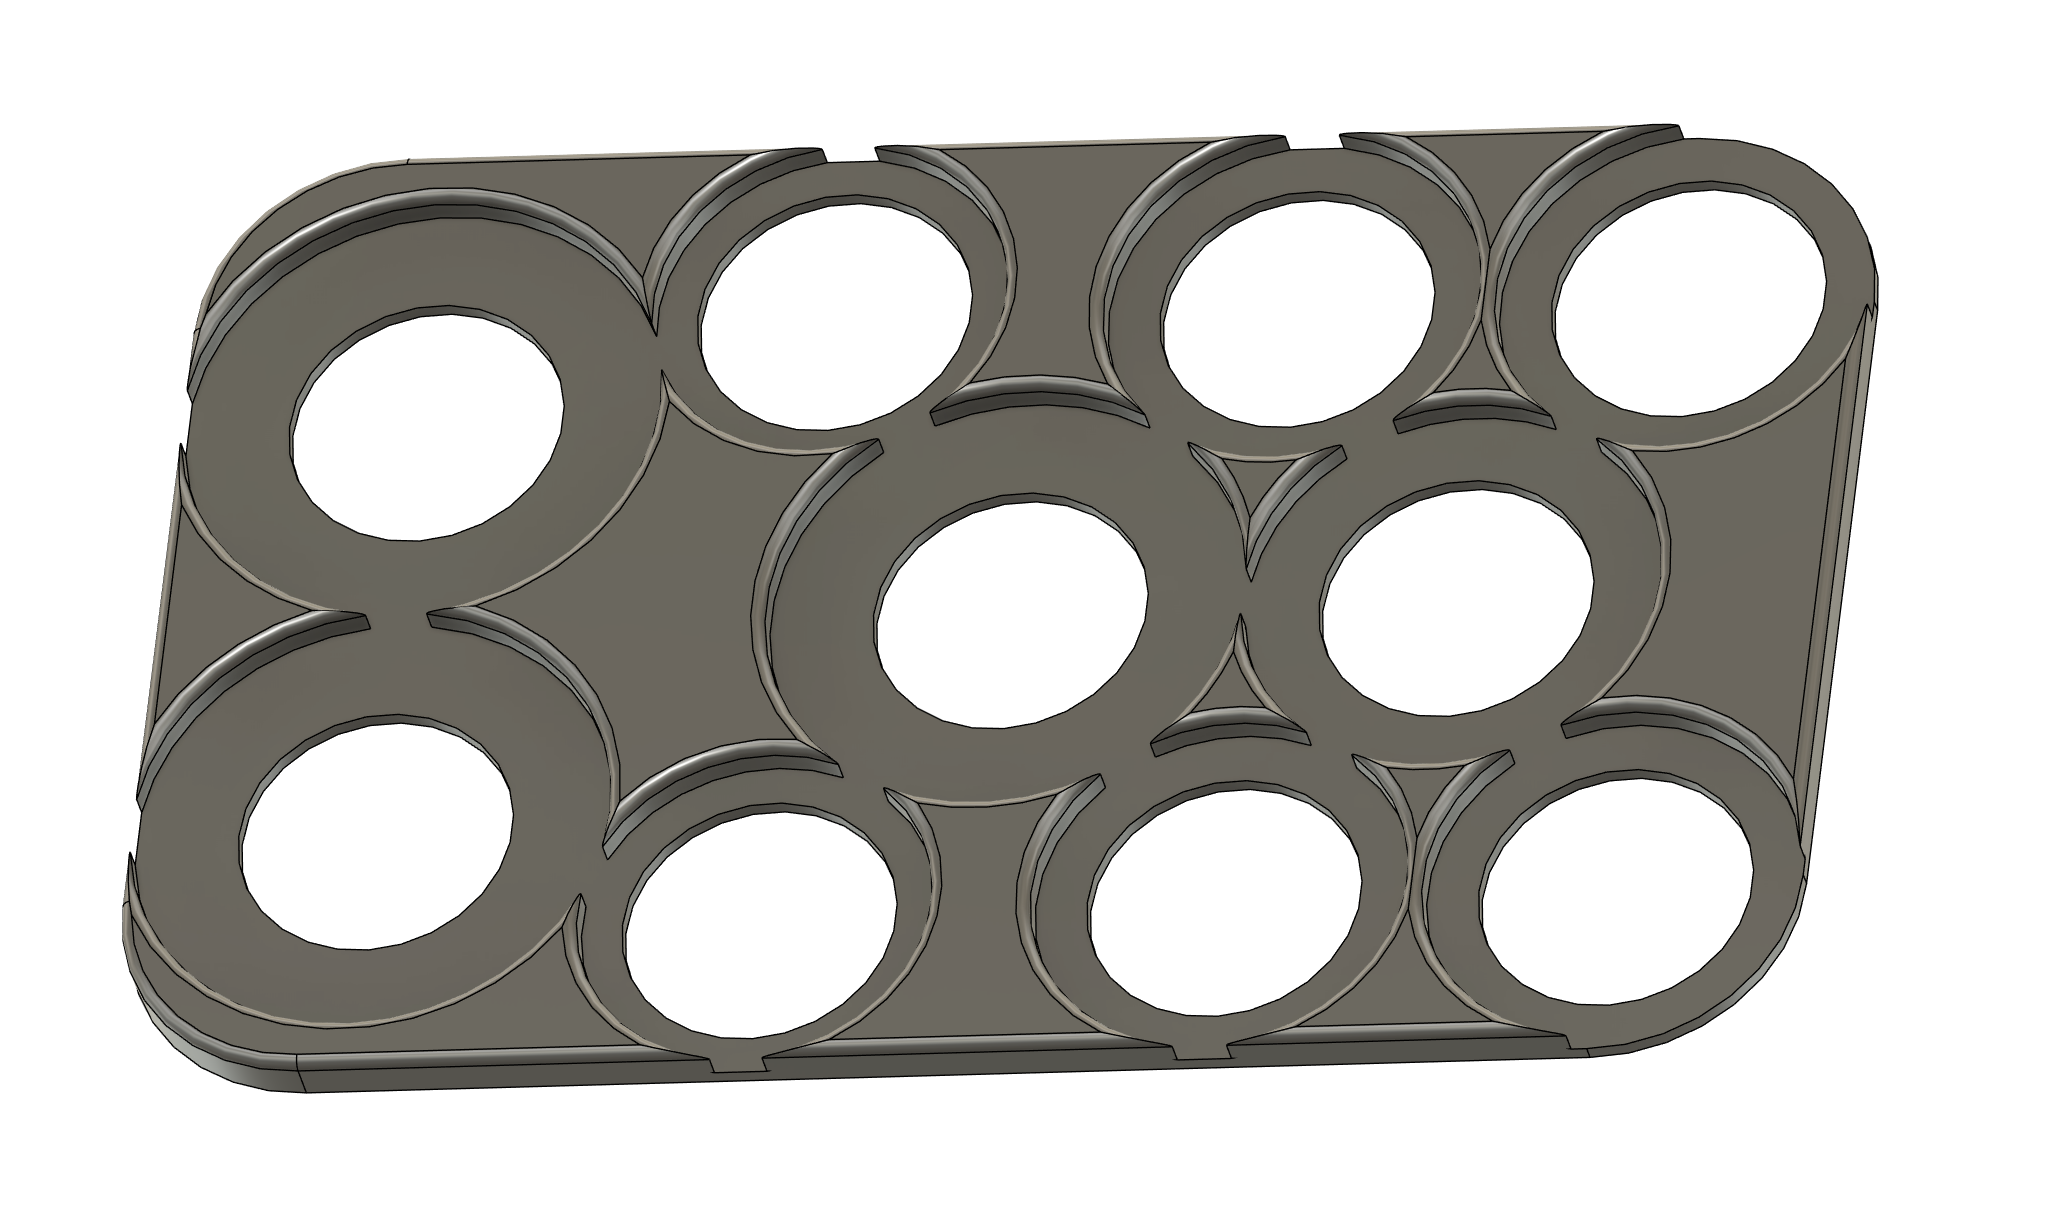
Final Design
Between the transition fit and snap fit designs, I went through at least 20 different test prints. Many of those were subtle adjustments to spacing before I settled on the final iteration. The print is less than 6g of total filament, and the print time is about 15-20 minutes on my X1C and H2D printers.
Print one yourself: wallet-sized-coin-holder-for-exact-change
Conclusion
Overall this was a fun project to turn around in just a few days and I’m pleased with the result. The combination of the project constraints, simulated packing, and design optimization was good practice combining my skillsets. I’ll personally keep this in my backpack just in case I need to make change or need a spare coin for heads or tails, but I’m sure it’ll be helpful to the right person.